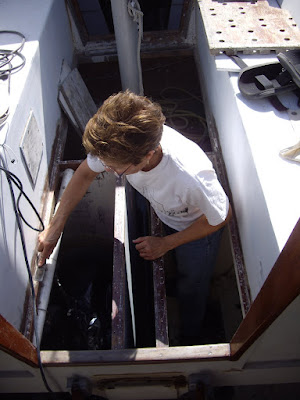
After getting all the teak runners off the cockpit sole, epoxy coating the old plywood, and meticulously sealing all the staple holes, I found the sole halves on both sides of the now-open centerboard trunk top were not epoxied down to the frames they rested on! They were merely put down with a caulking compound that still held them, but with just a little lifting, I took them both off by hand. No wonder water could migrate into areas it should not have. The port side of the trunk had the sole screwed along the trunk edge, but the starboard side just lifted right off. So, the new plan is to replace these pieces of old ply with new. Here is how the area looks without the soles:
Doreen is scraping the debris off the support stringers. Her left hand is on the starboard side of the open trunk top. This picture shows just how deep the stowage area is on the starboard side with the sole of the cockpit removed. The port side houses the Farymann diesel engine covered in black plastic and not visible.
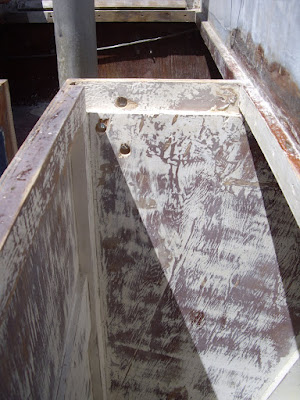
Seen from a different angle, here is that same compartment now partially sanded preparatory for new primer and paint before putting the lid on it (the new cockpit sole):
The three 3/4" inch holes at the bulkhead are to be filled with epoxy mix and re-drilled for adding a plate to cover the front of the trunk from the sole level down about 14" to the sub-sole area where the mast base is located.
Above is another view of the trunk from forward of the bulkhead seen in the preceding photo. You are looking aft at both compartments on both sides of the trunk. The white tube on the port side is a support piece with a track bolted to it with a traveler car on it. Hanging from the car there is a turnbuckle which attaches to a lift point on the engine for sliding it fore and aft in the compartment along its bed. By lifting it with the turnbuckle from the bed, it can be pulled aft to the opening at the galley. From there with a halyard from the mast top it is lifted up and into the cockpit for removal and replacement. I have down it a couple of times now with one other person and it works well despite its weight.
Very visible in this photo are the six holes in the upper part of the cross beam. Below are four more holes that do not penetrate completely. Nuts for the cover plate will be bedded in these partial holes for removal of the vertical cover plate for removal of the centerboard. It too can be hoisted out of the trunk with the main halyard once this opening and the steering mechanism is removed. Therefore, all the steering items attached here must be removable but securely attached to the front of the centerboard trunk. That is the engineering project I am immersed in right now.
Here is the front plate that covers the vertical part of the trunk and will mate with the holes shown on the bulkhead that supports the steering mechanism. I call this piece of 3/4" ply "Mr. Tee" for obvious reasons. Note the edges all have been coated with epoxy and filler to seal the plywood end-grain. The over-sized holes will get epoxy bog and be re-drilled for the bolts that will secure it to the bulkhead. This panel will be removable and serve as the main attachment of the steerer.
As can be seen in the picture below, the blocks that control the up and down of the centerboard need access and inspection for appropriate replacement. This old Schaefer cheek block was removed from the aft end of the trunk. The sheave still turned, but most of the aluminum plate on the top side of the unit has corroded away. Three of the four attachment bolts held, but one fell off in my hands when I removed it. To get to the unit, there is a small oval hole just above the block that was covered over with a large piece of 3/8" plywood secured with some of the same white mastic that held down the soles. Chisel and hammer work and I got the plywood off for access to the inspection port. Then a few sharp blows with my hammer and the small hand-size piece of plywood came out. Now I must build a new and better inspection port that will allow easy and frequent access to the new cheek block once it is in place. The plans call for a minimum 3/8" axle for the sheave, and this one is perhaps 1/4" only. The new one will be overkill with no aluminum anywhere! The waterline currently is just below this block but underway there is a lot of water that moves around in the trunk and keeps this metal wet with salt water. Ideally a small zinc anode should be added to the block.
Another view of the corroded old thing: Amazing it still held when i pulled the board down!
So, with about 20 different projects going on at once, the primary focus right now is to get the new sole in place covering the engine and stowage compartments on both sides of the trunk. In order to accomplish this goal, I need to finish sanding and painting in the compartments now that they are more accessible with the sole on both sides of the trunk removed.
Keeping the dream alive and the enthusiasm going is paramount to the success of the overall project. I have leaned heavily on posts from Mark Johnson of the Searunner 34 Delphys. Mark has been exceedingly helpful with ideas, his experience going down this same road. His photos on the Searunner thread of the Cruisers Forum is filled with good advice, excellent photos, and lots of detail. Others have been helpful in keeping me on the right track. John Marples was very quick in sending me several of the pages to the plans i requested. Dave Weber came by for a few days and shared some of his thoughts about the 34's he has seen in his travels. Mike Lenemen is in the wings as soon as I need him for some rigging expertise. Roy Mills helped with some thoughts on bedding compounds when I called him on the phone. It is this large multi-hull community and Searunner sailors specifically that are a viable part of keeping me going. Jack Molan has been a world of help with his information on synthetic standing rigging and all the photos he has of his SR-34 Corazón in Mexico. A number of vendors have been helpful for much of the on-line purchasing I do of epoxy, fiberglass cloth, peel ply, boat hardware, and myriad other items that go into such a major project as refurbishing and re-outfitting an old boat.
Without the continuous positive help of my first mate and wife Doreen, this effort would not reach fruition. We share a common goal of getting Etak cruise-worthy. Her preparation of nutritious food and logistic help is vital to the process. Doing it alone I would find myself hard pressed to work hard, then eat well after all the work.
We are fortunate to have lots of boat stuff stored in a few locations. My nephew and niece, a mere 12 miles away have several crates of boat goodies. Our friend Al and his wife have a storage shed full of cushions, sails, lines, chain and anchors that would be impossible to keep on board and still be able to work on the boat.


No comments:
Post a Comment